Restoring the shape of a fractured incisor requires careful attention to anatomy, colour, and the way light passes through the tooth. In the anterior region, every detail contributes to ensuring that the restoration blends seamlessly with the natural dentition.
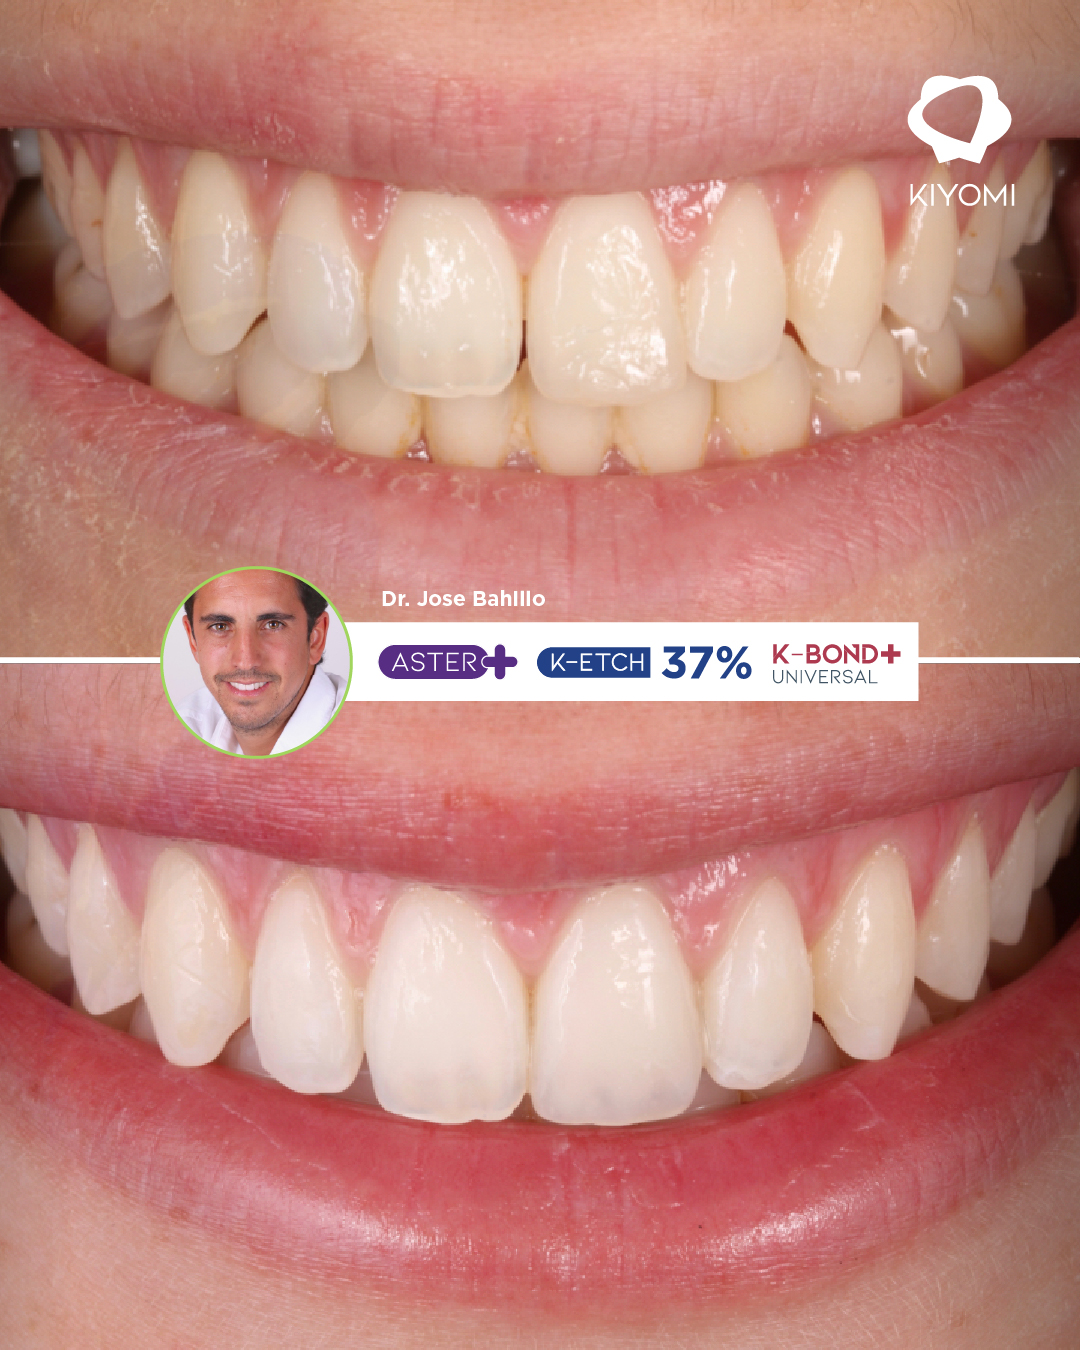
Dr. José Bahillo Varela presents a case of a coronal fracture of the upper left central incisor, treated with a direct restoration using a layering technique with Aster+ composite and materials from Kiyomi Dental. His approach combines anatomical planning, isolation, and adhesive techniques to restore function and aesthetics while preserving dental tissue.
Dr. José Bahillo: Restorative Expertise and Attention to Detail
Holding a PhD in Dentistry, a professorship in Dental Prosthetics and Occlusion at the University of Santiago de Compostela, and a master’s degree in Dental Aesthetics, Oral Rehabilitation and Implants, Dr. José Bahillo presents this case from Policlínica Dental Bahillo in Santiago de Compostela.
His expertise is reflected in the treatment workflow: a diagnostic mock-up to guide the anatomy, a silicone index to transfer it intraorally, and the layering of dentine and enamel composite shades to reproduce the optical characteristics of the incisor.
The aim is to restore the lost tooth structure and achieve a harmonious visual transition between the natural tooth and the restoration.
The Clinical Case: Fracture of Tooth 2.1 Following a Bicycle Accident
A 23-year-old patient attended the clinic after a bicycle accident. Clinical and radiographic examinations ruled out root fractures; the tooth showed no mobility and responded positively to pulp vitality tests.
The diagnosis documented in the case was a coronal enamel-dentine fracture without pulp exposure. As the fractured fragment was unavailable, Dr. Bahillo opted for a direct composite restoration using a layering technique.
This treatment choice was based on the clinical conditions and enabled the lost tooth structure to be restored using a conservative approach.
Central Incisor Reconstruction with Composite: Treatment Stages
Anatomical Planning and Rubber Dam Isolation
The procedure begins with a diagnostic mock-up and the fabrication of a silicone index, which serves as a guide for reproducing the palatal anatomy.
Dr. Bahillo then performs absolute isolation with a rubber dam to minimise contamination during treatment. Tooth preparation includes creating a chamfer in supported enamel, polishing the surface, and air abrasion with aluminium oxide to remove the aprismatic enamel layer.
This stage establishes suitable conditions for adhesion and facilitates control over the final restoration shape.
Etching with K-ETCH 37% and Bonding with K-Bond+ Universal
The adhesive protocol follows a total-etch technique. The clinician applies K-ETCH 37%, rinses and dries the surface, and applies K-Bond+ Universal. The case documentation describes light-curing the adhesive with the Kira LED curing light for 20 seconds on each surface, buccal and palatal.
The value of these materials lies in addressing two essential requirements of the procedure: controlling substrate conditioning and providing an adhesive compatible with the selected bonding protocol.
Layering with Aster+: Recreating Anatomy and Controlling Light
To reproduce the palatal wall, Dr. Bahillo adapts Aster+ enamel composite onto the silicone index before positioning it intraorally. The case describes preheating the material to approximately 37°C to facilitate adaptation.
He then builds up the internal anatomy using dentine shades with decreasing chroma towards the incisal region, leaving space to reproduce the translucency of the incisal edge. The restoration is completed with a final enamel layer approximately 0.5 mm thick, followed by finishing, polishing, and high-gloss polishing using the Kiyomi Dental K-shine Kit.
Combining different composite shades makes it possible to work separately on the body of the restoration and its outer layer, adjusting the appearance to match the tooth being reconstructed.
How Do Kiyomi Dental Products Contribute to This Treatment?
K-ETCH 37%: Visibility and Application Control
K-ETCH 37% is a blue, thixotropic phosphoric acid etching gel. These characteristics facilitate material visibility and precise application to the area requiring conditioning.
Its contribution to the restorative workflow focuses on application control during the adhesive preparation of enamel and dentine.
K-Bond+ Universal: Versatility for Adhesive Protocols
K-Bond+ Universal supports self-etch, selective-etch, and total-etch protocols. This versatility allows clinicians to adapt their bonding strategy to the clinical situation.
In the restoration described, Dr. Bahillo incorporates it into a total-etch technique following conditioning with K-ETCH 37%. Its 10-MDP formulation provides a mechanism for chemical interaction with dental tissues, in addition to the micromechanical retention achieved through the adhesive procedure.
Aster+: Dentine and Enamel Shades for Natural Integration
Aster+ is the main restorative material used in this reconstruction. Its availability in dentine and enamel shades facilitates the layering technique employed by Dr. Bahillo. Its polishability is another important characteristic for achieving a high-quality surface finish in anterior restorations.
In this case, its value lies in enabling the construction of the palatal wall, internal anatomy, and final enamel layer using materials from the same restorative range.
Kira: Accessibility for Light Curing
The Kira curing light is used during the adhesive light-curing protocol. Its 360° rotating head facilitates device positioning, while its emission spectrum of 385–515 nm allows compatibility with different photoinitiator systems.
In restorations requiring both buccal and palatal access, the ability to adjust the curing head is useful for positioning the light. Exposure parameters should be adjusted according to the material manufacturer’s instructions and clinical conditions.
Clinical Outcome: Aesthetic Integration at the One-Week Follow-Up
At the follow-up appointment one week later, Dr. Bahillo reported a well-integrated restoration and expressed satisfaction with the functional and aesthetic outcome.
This follow-up documents the initial treatment result. The case demonstrates how planning, layering techniques, and material selection work together to reconstruct a fractured central incisor while preserving the remaining tooth structure.
Dr. José Bahillo’s contribution lies in bringing these decisions together: from the initial anatomical guide to the final polishing stage, each step serves a specific restorative objective.
Discover Kiyomi Dental’s range of materials and consult our team of product specialists to find out which materials are best suited to your restorative dentistry procedures.